Chapter 2, PERIODIC MAINTENANCE
CHAPTER 2. PERIODIC INSPECTIONS AND ADJUSTMENTS
INTRODUCTION
- Read more about Chapter 2, PERIODIC MAINTENANCE
- Log in to post comments
CHAPTER 2. PERIODIC INSPECTIONS AND ADJUSTMENTS
INTRODUCTION
1. Headlight bulb replacement

a. Remove the cowling assembly.

b. Remove the 2 screws holding the light unit assembly to the headlight body.
1. Check the electrode condition and wear, insulator color and electrode gap.
2. Use a wire gauge for measuring the plug gap.
3. If the electrodes become too worn, replace the spark plug.
4. When installing the plug, always clean the gasket surface. Wipe off any grime that might be present on the surface of the spark plug, and torque the spark plug properly.
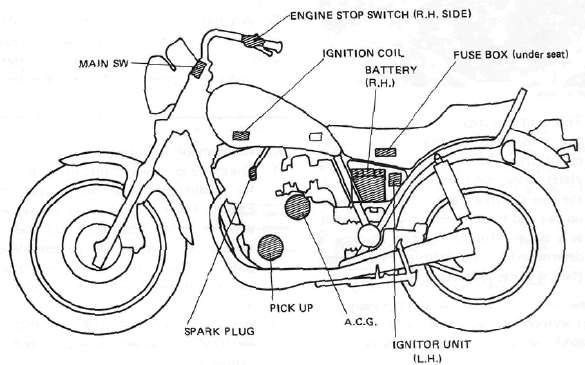
A. Battery
1. The fluid level should be between the upper and lower level marks. Use only distilled water if refilling is necessary.
CAUTION:
Normal tap water contains minerals which are harmful to a battery; therefore, refill only with distilled water.
Diode block
1. Remove the headlight, and remove the diode block from the wiring harness.

2. Check each diode and resistor in the diode block. If any diode in the resistor is not within specification, replace the diode block.

Sidestand relay operation
The sidestand relay operates by shorting the TCI control current. When the sidestand is down, the sidestand relay is closed, and the TCI control current is grounded through the sidestand relay. Thus, the engine will not run with the sidestand down unless the transmission is in neutral.
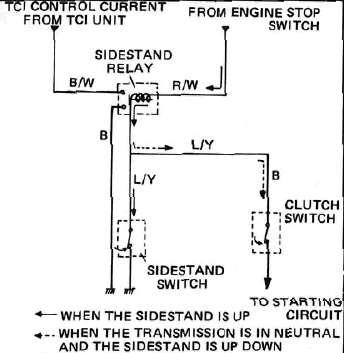
Sidestand relay inspection
XJ650J WIRING DIAGRAM
|
COLOR CODE |
|||||
|
Dg |
Dark green |
Br |
|||
IGNITION SYSTEM A. Circuit Diagram

Above circuit diagram shows only ignition circuit in wiring diagram.
B. Description
ELECTRIC STARTING SYSTEM
A. Circuit Diagram
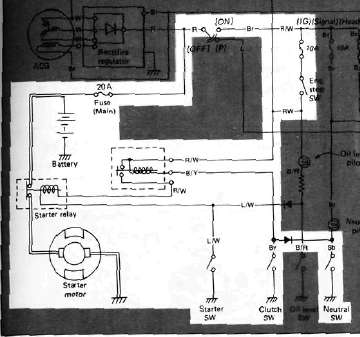
Above circuit diagram shows starter circuit in wiring diagram.
B. Starter Motor
1. Removal (see CHAPTER 3. "ENGINE DISASSEMBLY")
2. Inspection and repair