A. Fuel Petcock

If the fuel petcock is leaking or excessively contaminated, it should be removed from the fuel tank and inspected.
1. Remove the fuel tank and position it so that fuel will not spill when the petcock is removed.
2. Remove the petcock and inspect the filter screen. Replace the filter if seriously contaminated.
3. Remove the screws on the front and rear of the petcock and remove the plate, gaskets, lever, and diaphragm.
4. Inspect all components and replace any that are damaged. If the diaphragm is in any way damaged, or the petcock body gasket surfaces scratched or corroded, the petcock assembly must be replaced. If there is abrasive damage to any component, the fuel tank must be drained and flushed.
5. Reassemble the petcock and install it on the fuel tank.
B. Front and Rear Brake
1. Brake adjustment
a. Front brake lever free play adjustment. The brake can be adjusted by simply adjusting the free play of the brake lever. The piston in the caliper moves forward as the brake pad wears out, automatically adjusting the clearance between the brake pads and brake disc.
CAUTION:
Proper lever free play is essential to avoid excessive brake drag.

1. Adjuster 2. Lock nut a. 5~8 mm (0.2 - 0.3 in)
1) Loosen the adjuster lock nut on the brake lever.
2) Turn the adjuster so that the brake lever movement at the lever end is 5- 8 mm (0.2 ~ 0.3 in) before the adjuster contacts the master cylinder piston.
3) After adjusting, tighten the lock nut.
CAUTION:
Proper lever free play is essential to avoid excessive brake drag.
b. Rear brake pedal height adjustment
1) Loosen the adjuster lock nut (for pedal height).
2) By turning the adjuster bolt clockwise or counterclockwise, adjust the brake pedal position so that its top end is approximately 20 mm (0.78 in) below the footrest top end.
3) Secure the adjuster lock nut.
WARNING:
After adjusting the pedal height, the brake pedal free play should be adjusted.
c. Rear brake pedal free play adjustment

|
1. Adjuster bolt |
3. Footrest |
|
(for pedal height) |
4. Pedal height 20 mm [0.8 in) |
|
2. Lock nut |
5. Free play 20~ 30 mm (0.8-^ 1.2 in) |
Turn the adjuster on the brake rod clockwise or counterclockwise to provide the brake pedal end with a free play of 20 — 30 mm (0.8-1.2 in).
NOTE:-
Check to see whether or not the brake light operates correctly after adjusting.
2. Front brake pad and rear brake shoe
check a. Front brake pad
To check, look at the pad in front. If any pad is worn to the wear limit, replace the both pads in the caliper.
Front

1. Wear indicator
b. Rear brake shoe
To check, see the wear indicator position while depressing the brake pedal. If the indicator reaches to the wear limit line, replace the shoes.

1. Wear limit 2. Wear indicator
3. Brake fluid
Insufficient brake fluid may allow air to enter the brake system, possibly causing the brake to become ineffective. Check the brake fluid level and replenish when necessary observing these precautions:

1. Lower level
a. Use only the designated quality brake fluid; otherwise, the rubber seals may deteriorate, causing leakage and poor brake performance.
Recommended brake fluid: DOT #3
b. Refill with the same type and brand of brake fluid; mixing fluids may result in a harmful chemical reaction and lead to poor performance.
c. Be careful that water or other contamination does not enter the master cylinder when refilling. Water will significantly lower the boiling point and may result in vapor lock.
d. Brake fluid may erode painted surfaces or plastic parts. Always clean up spilled fluid immediately.
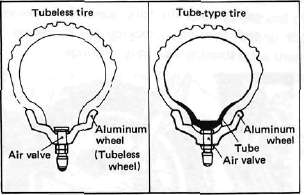
C. Tubeless Tires and Aluminum Wheels
This motorcycle is equipped with aluminum wheels designed to be compatible with either tube or tubeless tires. Tubeless tires are installed as standard equipment.
WARNING:
Do not attempt to use tubeless tires on a wheel designed for use only with tube-type tires. Tire failure and personal injury may results from sudden deflation.
Tube-type Wheel — Tube-type tires only
Tubeless-type Wheel — Tube-type or Tubeless tires
When using tube-type tires, be sure to install the proper tube also.
To insure maximum performance, long service, and safe operation, note the following precautions:
1. Check tire pressure, before riding, adjust as necessary.
2. Before operation, always check the tire surfaces for wear and/or damage; look for cracks, glass, nails, metal fragments, stones, etc. Correct any such hazard before riding.
3. Always inspect the aluminum wheels before a ride. Place the motorcycle on the center stand and check for cracks, bends or warpage of the wheels. Do not attempt even small repairs to the wheel. If a wheel is deformed or cracked, it must be replaced.
4. Tires and wheels should be balanced whenever either one is changed or replaced. Failure to have a wheel assembly balanced can result in poor performance, adverse handling characteristics, and shortened tire life.
5. After installing a tire, ride conservatively to allow the tire to seat itself on the rim properly. Failure to allow proper seating may cause tire failure resulting in damage to the motorcycle and injury to the rider.
6. After repairing or replacing a tire, check to be sure the valve stem lock nut is securely fastened. If not, torque it as specified.
Tightening torque: 0.15 m-kg (1.1 ft-lb)
- Printer-friendly version
- Log in to post comments