CHAPTER 5. CHASSIS
FRONT WHEEL
A. Removal
1. Place the motorcycle on the center stand.
2. Remove the cotter pin and wheel axle

3. Remove the speedometer cable holder securing bolt.

4. Loosen the pinch bolt securing the axle.

1. Pinch bolt
5. Remove the axle shaft and the front wheel. In this case, make sure the motorcycle is properly supported.
NOTE:
Do not depress the brake lever when the wheel is off the motorcycle as the brake pads will be forced to shut.

B. Front Axle Inspection
Remove any corrosion from the axle with fine emery cloth. Place the axle on a surface plate and check for bends. If bent, replace axle. Do not attempt to straighten a bent axle.
C. Front Wheel Inspection
This motorcycle is equipped with aluminum wheels designed to be compatible with either tube or tubeless tires.
Tubeless tires are installed as standard equipment.
WARNING:
Do not attempt to use tubeless tires on a wheel designed for use only with tube-type tires. Tire failure and personal injury may results from sudden deflation.
|
Tube-type Wheel > |
Tube-type Tires Only |
|
|
|
|
Tubeless-type Wheel > |
Tube-type or |
|
|
WARNING:
When using tube-type tires, be sure to install the proper tube also.


Refer to 'Tubeless Tire and Aluminum Wheel Manual" for the proper tubeless and aluminum wheel servicing.
1. Check for cracks, bends or warpage of wheels. If a wheel is deformed or cracked, it must be replaced.
2. Check wheel run-out. If the deflection exceeds the tolerance below, check the wheel bearings or replace the wheel as required.
|
Rim-run-out limits: |
|
|
Vertical |
- 2 mm (0.079 in) |
|
Lateral |
- 2 mm (0.079 in) |
3. Check wheel balance. Rotate the wheel lightly several times and observe resting position. If the wheel is not statically balanced, it will come to reset at the same position each time. Install an appropriate balance weight at lightest position (at top).
NOTE:
The wheel should be balanced with the brake disc installed.
4. After installing a tire, ride conservatively to allow the tire to seat itself on the rim properly. Failure to allow proper seating may cause tire failure resulting in damage to the motorcycle and injury to the rider.
5. After repairing or replacing a tire, check to be sure the valve stem lock nut is securely fastened. If not, torque it as specified.
Tightening torque: 0.15 m-kg (1.1 ft-lb) !
D. Replacing Wheel Bearings
If the bearings allow play in the wheel hub or if wheel does not turn smoothly, replace the bearings as follows:
1. Clean the outside of the wheel hub.
2. Drive the bearing out by pushing the spacer aside and tapping around the perimeter of the bearing inner race with a soft metal drift pin and hammer. The spacer "floats" between the bearings. Both bearings can be removed in this manner.
WARNING:
Eye protection is recommended when using striking tools.
3. To install the wheel bearing, reverse the above sequence. Use a socket that matches the outside race of the bearing as a tool to drive in the bearing.
CAUTION:
Do not strike the center race or balls of the bearing. Contact should be made only with the outer race.
E. Installing Front Wheel
When installing the front wheel, reverse the removal procedure. Note the following points:
1. Lightly grease the lips of the front wheel oil seals and the gear teeth of speedometer drive and driven gears. Use lightweight lithium soap base grease.
2. Install the speedometer cable holder securing bolt.
3. Make sure the projecting portion (torque stopper) of the speedometer housing is positioned correctly.

1. Torque stopper
4. Tighten the axle nut and install a new cotter pin.
Axle nut torque: 10.7 m-kg (77.4 ft-lb)
5. Install the front fender
6. Before tightening the pinch bolt, compress the front forks several times to make sure of proper fork operation.
7. Tighten the axle pinch bolt.
Axle pinch bolt torque: 2.0 m-kg (14.5 ft-lb)
REAR WHEEL
A. Removal
1. Place the motorcycle on the center stand.
2. Remove the tension bar and the brake rod from the brake shoe plate. The tension bar can be removed by removing the cotter pin and nut from the tension bar bolt. The brake rod can be removed by removing the adjuster.
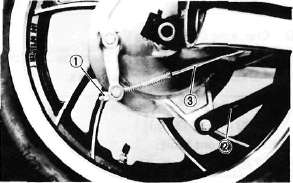
1. Adjuster 2. Tension bar 3. Brake rod
3. Remove the axle nut cotter pin and axle nut.
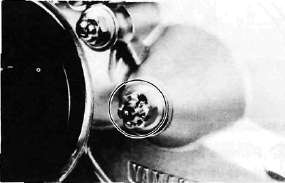
4. Loosen the rear axle pinch bolt and pull out the rear axle.
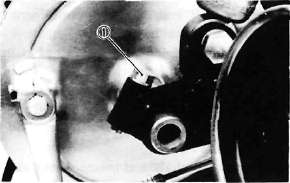
1. Pinch bolt
5. Move the wheel to the right side to separate it from the final gear cases and remove the rear wheel.

B. Checking Brake Shoe Wear
1. Measure the outside diameter at the brake shoes with slide calipers.
Front brake shoe diameter:
180 mm (7.09 in) Replacement limit:
176 mm min. (6.93 in)
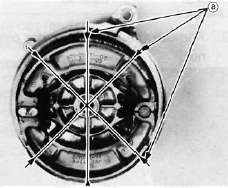
a. Measuring points
2. Remove any glazed areas from the brake shoes using coarse sand paper.
C. Brake Drum
Oil or scratches on the inner surface or the brake drum will impair braking performance or result in abnormal noises.
Remove oil by wiping with a rag soaked in lacquer thinner or solvent.
Remove scratches by lightly and evenly polishing with emery cloth.
D. Brake Shoe Plate
Remove the camshaft and grease. If the cam face is worn, replace.
NOTE:
Before removing the cam lever, put a match mark on the cam lever and camshaft to indicate their positions for easy assembly.
E. Rear Axle Inspection
(See Front Wheel, Axle Inspection Procedure.)
F. Replacing Wheel Bearings
Rear wheel bearing replacement is similar to the procedure for the front wheel.
G. Rear Wheel Inspection
(See Front Wheel, Inspection Procedures)
H. Installing Rear Wheel
1. Lightly grease lips of rear wheel oil seals.
2. Install the wheel assembly and axle.
NOTE:
When installing the rear wheel, be sure the splines on the wheel hub fit into the final gear case. Lightly apply grease to the gear teeth.
Always use a new cotter pin on the axle nut.
Tightening torque:
Axle nut: 10.7 m-kg (77.4 ft-lb) Axle pinch bolt: 0.6 m-kg (4.5 ft-lb)
FRONT BRAKE
CAUTION:
Disc brake components rarely require disassembly. Do not disassemble components unless absolutely necessary. If any hydraulic connection in the system is opened, the entire system should be disassembled, drained, cleaned and then properly filled and bled upon reassembly. Do not use solvents on brake internal components. Solvents will cause seals to swell and distort. Use only clean brake fluid for cleaning. Use care with brake fluid. Brake fluid is injurious to eyes and will damage painted surfaces and plastic parts.
A. Caliper Pad Replacement
It is not necessary to disassemble the brake caliper and brake hose to replace the brake pads. 1. Pull out the pad retaining pin while pinching the coil spring clip ends with pliers.
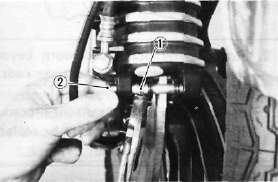
1. Coil spring clip 2. Pad retaining pin
2. Install the new brake pads. Replace the following parts if pad replacement is required.
a. Pads
b. Coil spring
c. Pin
NOTE:
Replace the pads as a set if either is found to be worn to the wear limit.

B. Caliper Disassembly
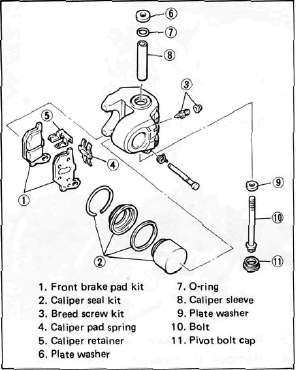
1. Remove the brake hose from the caliper. Allow the caliper assembly to drain into a container.
2. Place the open hose end into the container and pump the old fluid out of the master cylinder.
3. Remove the coil spring, pin and pads.
4. Remove the brake caliper holding bolt from the front fork.
5. Remove the retaining ring and the dust seal.
6. Carefully force the piston out of the caliper cylinder with compressed air. Never try to pry out the piston.
WARNING:
Cover the piston with a rag. Use care so that piston does not cause injury as it is expelled from the cylinder.
7. Remove the piston seal.
C. Master Cylinder Disassembly
1. Remove the brake light switch.

2. Remove the brake hose.

3. Remove the brake lever and spring.
4. Remove the master cylinder from the handlebar. Remove the cap and drain the remaining fluid.
5. Remove the master cylinder dust boot.
6. Remove the snap ring.

7. Remove the master cylinder cup assembly. Note that the cylinder cups are installed with the larger diameter (lips) inserted first.
D. Brake Inspection and Repair
Recommended Brake Component
Replacement Schedule: Brake pads; As required Piston seal, dust seal; Every two years Brake hoses; Every four years Brake fluid; Replace only when brakes are disassembled
1. Replace the caliper piston if it is scratched.

Replace any brake pad worn beyond limits. Always replace the brake pads as a set.
See Caliper Pad Replacement procedure for a listing of the parts to be replaced when pads are replaced.
Wear limit: 6.5 mm (0.26 in)

1. Pad thickness 3. Wear indicator
2. Wear limit 4. Measuring points
3. Replace piston and dust seals if damaged. Replace seals every two years.
4. Inspect master cylinder body. Replace if scratched. Clean all passages with new brake fluid.
5. Inspect the brake hoses. Replace every four years or immediately if cracked, frayed, or damaged.
6. Check for wear and deflection of disc.

Maximum deflection: 0.15 mm (0.006 in)
Minimum disc thickness: 6.5 mm (0.26 in)
If disc is worn beyond minimum thickness or deflection exceeds specified amount, replace disc.
E. Brake Reassembly
1. Caliper reassembly
All internal parts should be cleaned in new brake fluid only. Internal parts should be lubricated with brake fluid when installed. Replace the following parts whenever a caliper is disassembled.
* Bleed screw and rubber cap
*0-ring
*Piston seal *Dust seal
* Retaining ring

a. Install the piston seal and piston.
b. Install the pads.
2. Apply a thread locking compound such as "LOCTITE" to the pivot bolt.
3. Install the caliper assembly on the front fork.

WARNING:
When installing the pivot bolt, apply it with a thread locking compound such as "LOCTITE" and tighten to the specification.
Pivot bolt torque: 2.6 m-kg (18.8 ft-lb)
4. Attach the brake hoses,
Brake hose torque: 2.6 m-kg (18.8 ft-lb)
5. Brake disc assembly
If brake disc has been removed from hub or is loose, tighten bolts. Use new locking washers and bend over locking tabs after bolts are tightened.
Disc bolt torque: 2.0 m-kg (14.5 ft-lb)
6. Master cylinder reassembly

Reassemble master cylinder as shown in illustration.
Brake hose torque: (all brake union bolts) 2.6 m-kg (18.8 ft-lb)
7. Air bleeding
WARNING:
If the brake system is disassembled or if any brake hose has been loosened or removed, the brake system must be bled to remove air from the brake fluid. If the brake fluid level is very low or brake operation is incorrect, bleed the brake system. Failure to bleed the brake system properly can result in a dangerous loss of braking performance.
a. Add proper brake fluid to the reservoir. Install the diaphragm, being careful not to spill or overflow the reservoir.
b. Connect the clear plastic tube of 4.5 mm (3/16 in) inside diameter tightly to the caliper bleed screw. Put the other end of the tube into a container.

c. Slowly apply the brake lever several times. Pull in the lever. Hold the lever in "on" position. Loosen the bleed screw. Allow the lever to travel slowly toward its limit. When the limit is reached, tighten bleed screw. Then release the lever.
d. Repeat step "c" procedure until all air bubbles are removed from system.
NOTE:
If bleeding is difficult, it may be necessary to let the brake fluid system stabilize for a few hours. Repeat the bleeding procedure when the tiny bubbles in the system settle out.
- Printer-friendly version
- Log in to post comments
