Computerized Monitoring System
Computerized Monitoring SystemCMS Operation
CMS OperationGENERAL
Operation
NOTE: Before starting out on the road, check the motorcycle conditions using computerized monitor system.
1. When the main switch is turned on, all seven liquid crystal displays (LCDs) come on, with the fuel display indicating the amount of fuel in the tank.
2. When the engine is started, the system begins its scan of the motorcycle conditions. From top to bottom all the LCDs flash on and then off in sequence. If any one condition is found improper or inadequate, the red warning light will begin flashing and the LCD for the area in question will remain displayed.
3. Warning light operation can be controlled by the warning control switch. If the control switch is pushed once, the warning light glow will change from a flashing to a steady one. If pushed again, the glow will go out completely. Still another push on the switch brings back the warning light operation all over again.
NOTE:
1. This switch operates only when a malfunction is displayed on an LCD.
2. Even if the warning light is made to glow; steady or to go out, it will begin flashing on with another malfunction.
4. The entire monitoring system condition can be checked by pushing the check switch. The system will scan through the seven areas in sequence, just as when the engine was first started, to assure the rider that the system is functioning properly.

1. Turn indicator light
2. Neutral indicator light
3. High beam indicator light
4. Warning light
5. Display panel
6. Warning control switch
7. Check switch
(XJ 750R panel shown)
| CMS Operation Flow Chart | ||||
| All circuits OFF | ||||
| ▼ | ||||
| Main switch ON | ||||
| ▼ | ||||
| Red warning light and all LCD readouts stay ON for self check. | ||||
| ▼ | ||||
| Engine Starts | ||||
|
|
▼ | |||
| ► | The system automatically cycles once. (CMS monitors all functions during machine operation.) |
► | Red warning light FLASHES and a particular LCD readout stays ON | ◄ |
| ▲ | ▼ | ▼ | ▲ | |
| ▲ | If all LCD readouts are OFF | ◄ |
Displayed function must be corrected immediately. |
▲ |
| ▲ | ▼ | ▼ | ▲ | |
| ▲ |
Monitored functions are in good condition. |
Push Warning control switch | ▲ | |
| ▲ | ▼ | ▼ | ▲ | |
| ▲ | Press Check switch |
Red warning light stops flashing and stays on. LCD readout continues to stay ON. |
▲ | |
| ▲ | ◄ | ▼ | ▲ | |
| Push Warning control switch | ▲ | |||
| ▼ | ▲ | |||
| Main switch OFF |
Red warning light goes OFF |
▲ | ||
| ▼ | ▼ | ▲ | ||
| Operation stops. | Push Warning control switch | ▲ | ||
Display Panel (XJ650L Turbo panel shown)
Sidestand

This indicator is displayed when the sidestand is extended. Be sure to retract it before starting out on the road.
Brake fluid level

This indicator is displayed when the brake fluid level is below specification in the front brake master cylinder.
Do not run the motorcycle with a low brake fluid level for a long time or at high speeds.
Engine oil level

This indicator is displayed when the engine oil level is low. If it remains displayed or keeps flickering while riding, add engine oil.
Do not run the motorcycle with a low engine oil level for a long time or at high speeds.
Battery fluid level

This indicator is displayed when the battery fluid level is low. If it remains displayed, add distilled water.
CAUTION:
Continuous riding with a low battery fluid level will damage the battery.
Headlight bulb

This indicator is displayed when the headlight bulb is burned out. If it remains displayed, have it replaced and correctly adjusted.
Tail/brake light bulbs

This indicator is displayed when the taillight and/or brake light bulbs are burned out. If it remains displayed, have it replaced.
Fuel amount

This indicator is displayed when the fuel level is low. If it remains displayed or keeps flickering while riding, add fuel.
This indicator is displayed the amount of fuel in the tank. If the four blocks are displayed, the fuel is full.
IMPORTANT NOTICE Headlight, Tail/brake lights
* Bulbs of wattage other than specified mustn't be used.
Extra electric accessories mustn't be connected to the each light circuit.
Reason:
1. CMS calculates the amount of current flow in these circuits.
2. Excessive current flow in these circuits may damage the control units, or
3. LCD panel may not display failure. Battery Sender
* Clean battery sender terminal occasionally. (Approximetry every 5,000 km)
Reason: The terminal, though made of lead, can be corroded on its surface, resulting in malfunction.
Other Senders
* Do not modify or add any electrical load to any sender.
Reason: Any modification may result in CMS malfunction.
Handling
* The instrument panel mustn't be subjected to any water splashes or steam from underneath.
* The display panel mustn't be pressed hard or given any shock.
* A magnet or other magnetized objects mustn't be put near the display panel.
CMS Components
CMS ComponentsSender locations
XJ650
System Components
|
Sidestand switch |
Brake fluid level sender |
Engine oil level sender |
|
|
|
|
|
Battery fluid level sender |
Headlight bulb |
|
|
Tail/Brake light bulb |
||
|
|
|
|
|
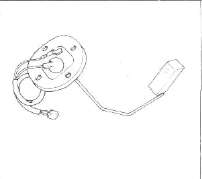
Fuel level sender |
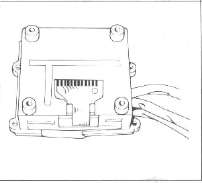
Computerized monitor |
LCD panel |
|
|
|
|
|
Computer unit |
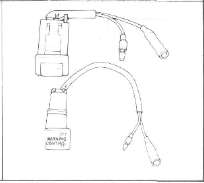
"Check" switch |
"Warning" switch |
|
|
|
|
Symbol Identification
|
|
Conductor |
|
Bulb (single filament) |
|
|
|
Crossing conductor (not joined) |
|
Bulb (Double filament) |
|
|
|
Conductors joined |
|
Wire connector |
|
|
|
Ground (earth) |
|
Diode |
|
|
|
Resistor (adjustable) |
|
Sender |
|
|
|
Switch |
|
|
Power input |
|
|
Switch
|
|
|
Power output |
|
|
Fuse |
|
Battery |
|
Color Code
|
Br |
Brown |
Gy |
Gray |
|
B |
Black |
G/R |
Green/ Red |
|
L |
Blue |
G/L |
Green/ Blue |
|
W |
White |
G/Y |
Green/Yellow |
|
Y |
Yellow |
L/W |
Blue/ White |
|
G |
Green |
Y/W |
Yellow/ White |
|
Y/G |
Yellow/ Green |
B/R |
Black/ Red |
|
W/R |
White/Red |
G/W |
Green/ White |
|
W/B |
White/ Black |
W/L |
White/Blue |
|
R/B |
Red/Black |
Y/B |
Yellow/Black |
NOTES ON TROUBLESHOOTING
Before checking the computerized monitor, check the following points:
Battery: Be sure to use a fully-charged battery for troubleshooting.
Motorcycle: The motorcycle to be inspected must be of standard specification (not modified after shipped from the factory).
1. No optional parts for users are fitted to the motorcycle. (Decoration light, etc.)
2. No modification is made to any part of the motorcycle. (Change in electrical circuits, etc.)
3. The level displayed on each monitor is correct, (the fuel, engine oil, brake fluid, and battery fluid levels are correct.)
4. All light bulbs are in good condition.
Tester: Use a Yamaha Pocket tester for checking of electrical parts.
CMS Monitor Troubleshooting
CMS Monitor TroubleshootingProblem: THE COMPUTERIZED MONITOR DOES NOT COME ON WITH THE MAIN SWITCH TURNED ON.
| Operate the horn and flashers to check the charged state of the battery. | Bad ► |
• Recharge the battery. • Check the fuse and main switch. |
| Good | ||
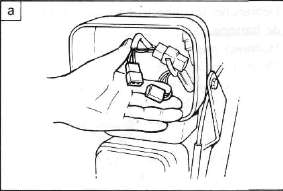
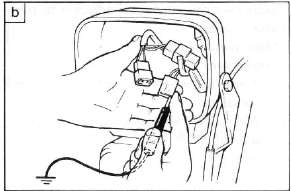
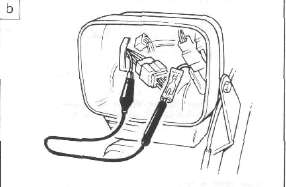
Apply 12 volts to the brown lead on the monitor side through the 6-P coupler in the headlight body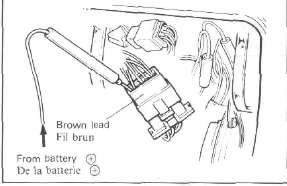 |
Comes on ► |
• Grounding is poor. (Check the black lead.) |
| Does not come on ▼ | ||
Ground the black lead of the coupler to the engine while applying 12 volts. |
||
|
Does not come on▼ |
||
|
• LCD is faulty. |
Problem: THE MONITOR COMES ON, BUT THE "WARNING" INDICATOR DOES NOT.
|
|
|
|
|
Check the WARNING indicator bulb. |
Burnt out |
• Replace. |
|
Good ▼ |
|
|
|
• CMS is faulty. |
|
|
Problem: WHEN THE ENGINE HAS STARTED, THE MONITOR DOES NOT AUTO-SCAN.
|
*Main switch is ON. Disconnect the W lead of the 9-P coupler (on the monitor side) in the headlight body. Apply DC 12V to the W lead.
|
Does not scan ► |
• CMS is faulty. |
| Scans ▼ | ||
|
• AC generator is faulty. |
Problem: THE MONITOR DOES NOT SCAN WITH THE CHECK SWITCH PUSHED.
| With the main switch turned on, all monitors come on, and when the engine has started, auto-scan starts. | Does not operate ► |
• See the "Troubleshooting" in the previous page. |
| Operates ▼ | ||
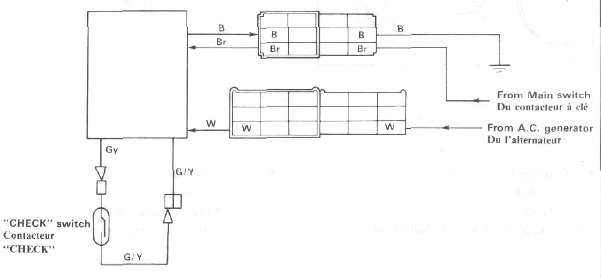
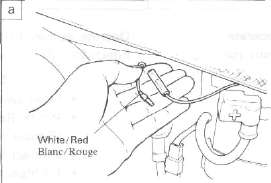
| Disconnect the connector adjacent to the check switch on the back of meter assembly.
Apply 12 volts to both the Brown and White leads, and ground the Black lead. Next, bring the Grey lead to directly contact the Green/ Yellow lead once, and separate them. |
Operates ► |
• Check switch is faulty. |
| Does not operate ▼ | ||
| • CMS is faulty. |
Problem: WHEN THE WARNING CONTROL SWITCH IS PUSHED, THE DISPLAY DOES NOT CHANGE. (DURING THE DISPLAY OF TROUBLE)
| Disconnect the connector adjacent to the "warning control" switch on the back of the meter assembly
Bring W/L to contact with G/Y, then disconnect it. By repeating this operation, check to see that the light switches from one to another while flashing.
|
Switches ► |
• Warning control switch is faulty. |
| Does not change ▼ | ||
| • CMS is faulty. |
CMS Sensors Troubleshooting
CMS Sensors TroubleshootingSIDESTAND MONITOR
|
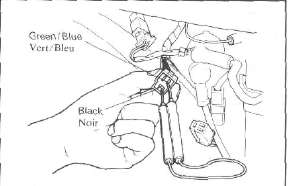
*Main switch is ON. Disconnect the 3-P coupler on the side-stand side.
|
Operates as specified in a. and b. ► |
• Side-stand switch is faulty.
|
| Measure voltage between G/L and B on harness side. | ||
| Less than 12V ▼ | ||
Disconnect the G/L lead from the 9-P coupler (on the monitor side) in the headlight body, and ground it.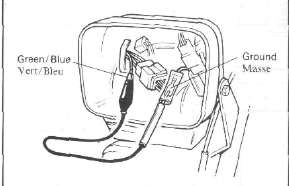 |
Operates ► |
• Green/blue lead is broken. |
| Does not operate ▼ | ||
|
• CMS is faulty. |
NOTE: If the side stand monitor comes on with the main switch turned on, CMS is faulty.
BRAKE FLUID MONITOR
|
*Main switch is ON. Disconnect the connector of white/black lead |
|
|
|
Ground the W/B female connector with a jumper wire |
Operates |
• Brake level sender is faulty.
|
|
Does not operate ▼ |
|
|
|
Disconnect the W/B lead of the 9-P coupler (on the monitor side) in the headlight body, and ground it. |
Operates |
• White/Black lead is broken. |
| Does not operate ▼ | ||
|
• CMS is faulty. |
NOTE: If the "BRK" monitor comes on with the main switch turned on, CMS is faulty.
ENGINE OIL MONITOR
|
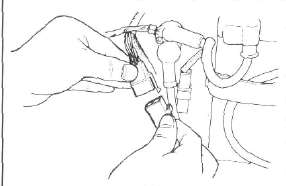
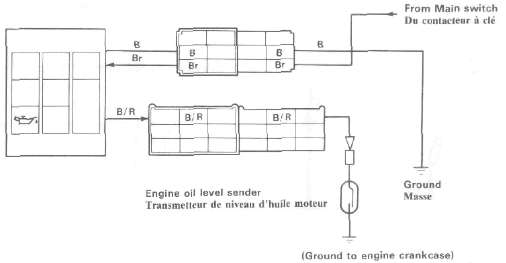
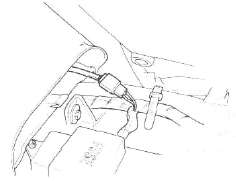
*Main switch is ON. Disconnect the connector adjacent to the oil level sensor located under the crankcase.
|
Operates as specified in a. and b. ► |
• Engine oil level sender is faulty.
Note: When installing the engine oil level sender, be sure to use a hand wrench to tighten the bolt. If it is tightened by using a compressed air driven tool, sender malfunctions may occur. |
| Does not operate ▼ | ||
Disconnect the B/ R lead of the 9-P coupler (on the monitor side) in the headlight body, and ground it. |
Operates ► |
• Black/red lead is broken. |
| Does not operate ▼ | ||
|
• CMS is faulty. |
NOTE: If the oil level monitor comes on with the main switch turned on, CMS is faulty.
BATTERY MONITOR
|
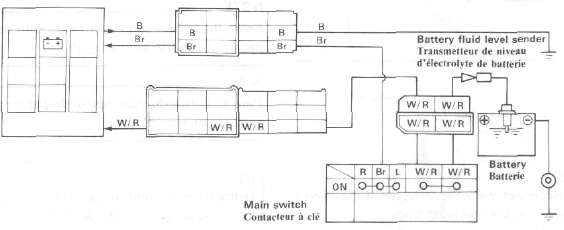
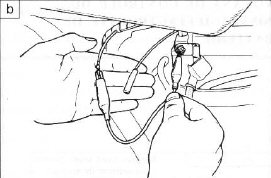
*Main switch is ON. Disconnect the connector adjacent to the battery sensor.
a. When disconnected: "BATT" monitor comes on.
b. When 12V is applied to the wire harness side of W/R lead: "BATT" monitor goes off. |
Operates as specified in a. and b. ► |
• Battery fluid level sender is faulty.
NOTE: Polish the battery sender terminals with sandpaper, check the sender again. |
| Does not operate ▼ | ||
|
Disconnect the 2-P connector of the main switch in the headlight body.
a. When disconnected: "BATT" monitor comes on.
|
Operate as specified in a. and b. ► |
• Main switch is faulty.
|
| Does not operate ▼ | ||
|
Disconnect the W/R lead of the 9-P coupler (on the monitor side) in the headlight body.
b. When 12V is applied to the monitor side of W/R lead: "BATT" monitor goes off.
|
Operates as specified in a. and b. ► |
• White/Red lead is broken. (Main switch to 9-P coupler) |
| Does not operate ▼ | ||
| • CMS is faulty. |
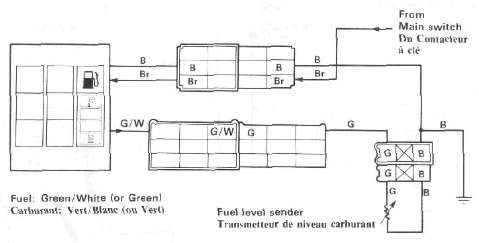
FUEL MONITOR
'Fuel tank is full.
| *Main switch is ON. *Engine running Disconnect the 3-P coupler on the fuel tank side. a. When disconnected: Fuel monitor comes on but the display of the remaining amount of fuel goes off.
b. When green/white lead is grounded: The remaining amount (4 blocks) of fuel is displayed, but the fuel monitor goes off.
|
Operates as specified in a. and b. ► |
• Fuel level sender is faulty.
|
| Does not operate ▼ | ||
|
Disconnect the G/W lead at the 9-P coupler (on the monitor side) in the headlight body, and ground it.
|
Operates ► |
• Green/White lead is broken. |
| Does not operate ▼ | ||
|
• CMS is faulty. |
NOTE: If both monitor and blocks are displayed with the main switch turned on, CMS is faulty.
Troubleshooting Headlight, Brakelight, Taillight issues and other CMS Troubles
Troubleshooting Headlight, Brakelight, Taillight issues and other CMS TroublesProblem: HEADLIGHT DOES NOT COME ON. (MONITOR DOES NOT LIGHT.)
Light lead connections:
HI: Yellow to Yellow/Green (or Yellow/Red)
Lo: Green to Green/Red
NOTE: On the XJ750, no lights will come on before the engine starts.
|
Disconnect the 3-P coupler (for headlight) in the headlight body, and check voltage. |
12V ► |
Headlight bulb is burnt out. |
| Less than 12V ▼ | ||
| Measure input voltage on the wire harness side through the 6-P coupler in the headlight body. Hi: Yellow to Ground Lo: Green to Ground  • • |
Reads 12V ► |
• CMS is faulty |
| Less than 12V ▼ | ||
|
• Dimmer switch Check the condition of these parts according to the electrical section of the service manual. |
Problem: HEADLIGHT COMES ON AND MONITOR WILL NOT GO OFF.
• CMS is faulty.
• LCD is faulty.
• Connector is faulty.
NOTE: If the monitor (HEAD) comes on with the main switch turned on, both LCD and connector are in good condition. Replace CMS.
Problem: THE HEADLIGHT BULB IS NOT BURNT OUT, BUT THE MONITOR COMES ON.
• Yellow/Green lead is broken.
• Green/Red lead is broken.
• Black lead is broken.
• Connector is loose.
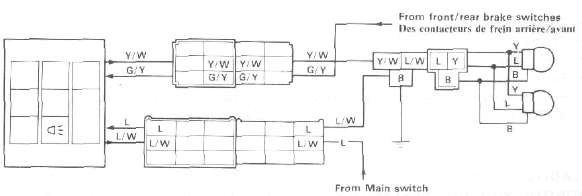
TAIL/BRAKE LIGHT DOES NOT COME ON. (MONITOR DOES NOT COME ON.)
Light lead connections:
Tail: Blue-Blue/White
Brake: Green/Yellow- Yellow/White (or Yellow/Black)
|
Disconnect the 3-P coupler of the taillight, and measure voltage. |
12V ► |
• Burnt taillight bulb
|
|
Less than 12V ▼ |
||
|
Disconnect the Y/W and L/W leads from the monitor side of the 6-P and 9-P couplers, and check voltage. |
12V |
• Broken Yellow/White lead
|
|
Less than 12V ▼ |
|
|
| Measure voltage of the L lead and G/Y lead on the wire harness side. Tail: Blue lead from Main switch Brake: Green/Yellow lead from brake switches   |
12V ► |
• CMS is faulty. |
| Less than 12V ▼ | ||
|
• Brake: Check the brake switch and leads. |
|
|
EXAMPLES OF OTHER TROUBLES
The computerized monitor system may malfunction under the following conditions, though it is in good condition. The term "malfunction" means an erratic change in the display when the computerized monitor is not operated.
1. The battery is in a state of extremely low voltage. The computerized monitor system is so designed that it operates normally when a specific voltage is input. Therefore, if the battery has almost run down or sulfation, the system may malfunction.
2. The computerized monitor system is interfered by radio noise. The system has a protective device against radio noise, but some special radio noise may cause the system to malfunction.
Radio noise can be produced in the following cases:
a. When spark plugs without resistor are used on an engine for which spark plugs with built-in resistor should be used.
b. When a special horn is used.
EXAMPLES OF ERRATIC LC. DISPLAYS
If any one of the following symptoms appears, the L.C. display is considered to be faulty.
1. Part of the L.C. display is chipped off.

2. The deflecting plate has scratches or cavities.

3. Glass is cracked or chipped,
4. Contrast is uneven on the same display.

CMS Wiring Diagram
CMS Wiring DiagramXJ650


