Steering Head Inspection
1. Place the motorcycle on its centerstand, then elevate the front wheel.
2. Check the steering assembly bearings. Grasp the bottom of the forks and gently rock the fork assembly back and forth. Adjust if any looseness can be detected.
Adjustment

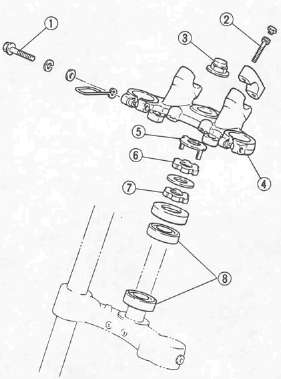
Steering head adjustment steps:
• Loosen the pinch bolts (1) .
• Remove the handlebar securing bolts (2) .
• Remove the handlebar.
•Remove the steering stem nut (3) .
•Remove the steering crown (4) .
•Remove the lock washer (5).
•Loosen the upper ring nut (6) .
•Tighten the lower ring nut (7)
Ring Nut (Lower): 50 Nm (5.0 m.kg, 36 ft-lb)
NOTE:
The tapered side of ring nuts must face downward.
• Loosen the ring nut (7) completely and retighten it to specification.
Rint Nut (Lower): 6Nm (0.6 m-kg, 4.3 ft-lb)
• Check the steering stem by turning it lock to lock. If there is any binding, remove the steering bearings (8) .
(See CHAPTER 6, STEERING HEAD for more details.)
• Hand-tighten the upper ring nut (6) , then align the slots of both ring nuts. If not aligned, hold the lower ring nut (7) and tighten the other until they are aligned.
• Install the lock washer (5).
NOTE:
Make sure the lock washer tab is placed in the slots.
• Install the steering crown (4) and tighten the steering stem nut (3) to specification.
Steering Stem Nut: 110 Nm (11.0 m-kg, 80 ft-lb)
• Install the handlebar (3) and torque the bolt (2) to specification.
Pinch Bolt: 20 Nm (2.0m.kg, 14 ft-lb)
Handlebar Bolt: 20 Nm (2.0 m-kg, 14 ft-lb)

• Install the fork and bolt caps.
- Printer-friendly version
- Log in to post comments