ELECTRICAL
A. Battery
1. The fluid level should be between the upper and lower level marks. Use only distilled water if refilling is necessary.
CAUTION:
Normal tap water contains minerals which are harmful to a battery; therefore, refill only with distilled water.
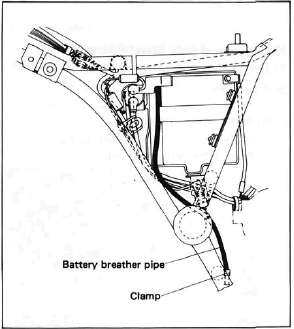
2. Always make sure the connections are correct when installing the battery. Make sure the breather pipe is properly connected, properly routed, and is not damaged or obstructed.
CAUTION:
The battery must be charged before using to insure maximum performance. Failure to properly charge the battery before first use, or low electrolyte level will cause premature failure of the battery. Charging current: 1.2 amps/10 hrs or until the specific gravity reaches 1.280 at 20°C (68°F)
WARNING:
Battery electrolyte is poisonous and dangerous, causing severe burns, etc. Contains sulfuric acid. Avoid contact with skin, eyes or clothing. Antidote: EXTERNAL-Flush with water.
INTERNAL—Drink large quantities of water or milk. Follow with milk of magnesia, beaten egg or vegetable oil. Call physician immediately.
Eyes: Flush with water for 15 minutes and get prompt medical attention. Batteries produce explosive gasive gases. Keep sparks, flame, cigarettes, etc. away. Ventilate when charging or using in closed space. Always shield eyes when working near batteries. KEEP OUT OF REACH OF CHILDREN.
B. Spark Plug
1. Check the electrode condition and wear, insulator color and electrode gap.
2. Use a wire gauge for measuring the plug gap.
3. If the electrodes become too worn, replace the spark plug.
4. When installing the plug, always clean the gasket surface. Wipe off any grime that might be present on the surface of the spark plug, and torque the spark plug properly.
Standard spark plug: BPR7ES (NGK) or W22EPR-U (ND)
Spark plug gap: 0.7 ~ 0.8 mm (0.028 ~ 0.032 in)
Spark plug tightening torque:2.0 m-kg (14.5 ft-lb)
C. Headlight
1. Headlight bulb replacement
a. Remove the 2 screws holding the light unit assembly to the headlight body.

b. Disconnect the lead wires and remove the light unit assembly.
c. Turn the bulb holder counterclockwise and remove the defective bulb.

d. Slip a new bulb into position and secure it with the bulb holder.
CAUTION:
Avoid touching the glass part of the bulb. Also keep it free from oil stains; otherwise, the transparency of the glass, life of the bulb and illuminous flux will be adversely affected. If the glass is oil stained, thoroughly clean it with a cloth moistened with alcohol or lacquer thinner.
Keep flammable products or your hands away from the bulb while it is on, becuase it heats up. Do not touch the bulb until it cools down.

e. Reinstall the light unit assembly to the headlight body. Adjust the headlight beam if necessary.
f. Reinstall the light unit assembly to the headlight body. Adjust the headlight beam.
2. Headlight beam adjustment
a. Horizontal adjustment
To adjust the beam to the right, turn the adjusting screw clockwise.
To adjust the beam to the left, turn the screw counterclockwise.

b. Vertical adjustment:
Loosen the adjusting screw under the headlight body. Adjust vertically by moving the headlight body. When proper adjustment is determined, retighten the adjusting screw.

D. Fuse
The fuse block is located under the seat. If any fuse is blown, turn off the ignition switch and the switch in the circuit in question and install a new fuse of proper amperage. Then turn on the switches, and see if the electrical device operates. If the fuse immediately blows again, check the circuit in question (refer to "CHAPTER 6. ELECTRICAL").
WARNING:
Do not use fuses of a higher amperage rating than those recommended. Substitution of a fuse of improper rating can cause extensive electrical system damage and possible fire.
- Printer-friendly version
- Log in to post comments