CAMSHAFT

1 Cam cap
2 Dowel pin
3 Cam chain sprocket (IN)
4 Cam chain sprocket (EX)
5 Camshaft (IN)
6 Camshaft (EX)
7 Lifter
8 Adjusting pad
9 Cam chain guide (Front)
10 Oil delivery pipe
11 Copper washer
12 Camchain tensioner
13 Camchain tensioner end cap bolt
14 Camchain guide (Upper)
15 Valve retainer
16 Spring seat
17 Valve spring
18 Spring seat
19 Oil seal
20 Valve

* When installing the sprocket, use holes except for the one with a punch mark.
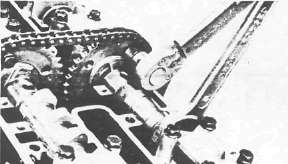
Camshaft installing steps:
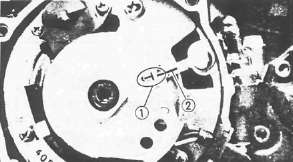
• Align the "T" mark on the timing plate 1 with the stationary pointer 2 . Do not turn the crankshaft during the camshafts installation.
• Install the cam chain sprockets onto the camshafts.
• Apply engine oil to the camshaft bearing surface.

• Turn the camshafts by hand so that the timing marks 3 (o: small hole) on the camshafts face upward.
• Install the dowel pins into the cam caps.
• Install the caps (without IN3 and EX3) onto the camshafts and tighten the cap bolts.
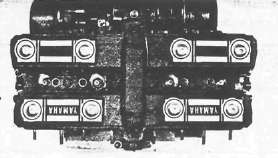
NOTE:
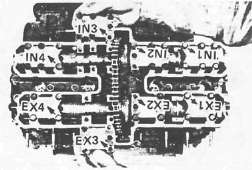
• The arrow mark on the caps should face toward the outside.
• The numbers are punched on the camshaft caps in increments from left to right.
Cam Cap: 10 Nm (1.0m-kg, 7.2 ft-lb)

2. Install cam chain sprockets
Cam chain sprockets installing steps:
• Align the "T" mark on the timing plate 1 with the stationary pointer on the pickup coil 2 . Do not turn the crankshaft when installing the sprockets.
• Place the cam chain onto the exhaust sprocket.
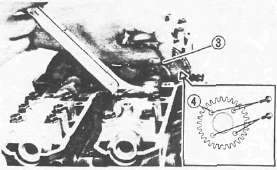
• Install the sprockets and finger tighten the sprocket bolts 3
NOTE:
When installing the sprocket, use holes except for the one with a punch mark 4.

• Rotate the exhaust camshaft to align the punched mark on the camshaft 5 with the "—" mark on the EX2 cam cap 6
• Force the exhaust camshaft clockwise to remove the cam chain slack.
• Place the cam chain onto the intake sprocket.
• Install the sprocket and finger tighten the sprocket bolt.

• Rotate the intake camshaft to align the punched mark on the camshaft with the "—" mark on the IN2 cam cap.
• Force the intake camshaft clockwise to remove all the cam chain slack.
• Insert your finger into the cam chain tensioner hole, and push the cam chain guide inward 7.
•While pushing the cam chain guide, be sure camshaft timing marks align with the cap marks.
• Remove the intake sprocket if marks do not align.
• Change the meshing position of sprocket and cam chain.
3. Install the cam chain tensioner
Cam chain tensioner installation steps:
• Remove the tensioner end cap bolt and spring.
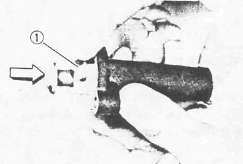
• Release the cam chain tensioner one-way cam 1 and push the tensioner rod into the tensioner body.
• Install the tensioner with a new gasket onto the cylinder.
Tensioner Body: 10Nm(1.0m-kg, 7.2ft-lb)

• Install the tensioner springs and end cap bolt 1 . Tighten the bolt.
Tensioner End Cap Bolt: 9 Nm (0.9m-kg, 6.5 ft-lb)
• Turn the crankshaft and install the sprocket securing bolts.
• Tighten the sprocket bolts.
Sprocket: 20 Nm (2.0m-kg, 14ft-lb)
CAUTION:
Be sure to attain the specified torque value to avoid the possibility of these bolts coming loose and causing damage to the engine.
Install the caps (IN3 and EX3) and camchain guide (Upper).
4. Apply engine oil to the cam chain, sprockets, camshafts, and valves.
5. Turn the crankshaft counterclockwise a few turns to ensure that it turns smoothly.
CAUTION:
Be sure the exhaust and intake camshaft mark are aligned with the cam cap marks.

6. Measure:
Valve clearance
Out of specification -> Adjust.
IN: 0.11 -0.20 mm (0.004 ~ 0.008 in)
EX: 0.21 -0.30 mm (0.008-0.012 in)
7. Install:
• Cylinder head cover
• Bolts
• Spark plugs
Cylinder Head Cover: 10 Nm (1.0m-kg, 7.2fMb)
SparkPlug: 17 .5 Nm (1.75 m-kg, 12 .5 ftlb)
8. Install:
• Gasket
• Crankshaft end cover (Left)
• Screw
Crankshaft End Cover (Left): 7 Nm (0.7 m-kg, 5.1 ft-lb)
- Printer-friendly version
- Log in to post comments